Bent double, like old beggars under sacks, Knock-kneed, coughing like hags, we cursed through sludge, Till on the haunting flares we turned our backs, And towards our distant rest began to trudge. Men marched asleep. Many had lost their boots, But limped on, blood-shod. All went lame, all blind; Drunk with fatigue; deaf even to the hoots Of tired, outstripped Five-Nines that dropped behind.
Gas! Gas! Quick, boys!—An ecstasy of fumbling, Fitting the clumsy helmets just in time, But someone still was yelling out and stumbling, And flound’ring like a man in fire or lime.
Dim through the misty panes and thick green light, As under a green sea, I saw him drowning.
In all my dreams before my helpless sight, He plunges at me, guttering, choking, drowning.
If in some smothering dreams, you too could pace Behind the wagon that we flung him in, And watch the white eyes writhing in his face, His hanging face, like a devil’s sick of sin, If you could hear, at every jolt, the blood Come gargling from the froth-corrupted lungs, Obscene as cancer, Bitter as the cud Of vile, incurable sores on innocent tongues,– My friend, you would not tell with such high zest To children ardent for some desperate glory, The old Lie: Dulce et decorum est Pro patria mori.
By Wilfred Owen, English poet and soldier. He was killed during the final week of World War I. This poem was published posthumously in 1920 by his friend and mentor Siegfried Sassoon, another war poet.
Met opgetrokken schouders, toegeknepen ogen, haast dravend en vaak hakend in de mat, lelijk en onbeholpen aan zusters arm gebogen, gaat elke week de idioot naar ’t bad.
De damp, die van het warme water slaat maakt hem geruster: witte stoom… En bij elk kledingstuk, dat van hem afgaat, bevangt hem meer en meer een oud vertrouwde droom.
De zuster laat hem in het water glijden, hij vouwt zijn dunne armen op zijn borst, hij zucht, als bij het lessen van zijn eerste dorst en om zijn mond gloort langzaamaan een groot verblijden.
Zijn zorgelijk gezicht is leeg en mooi geworden, zijn dunne voeten staan rechtop als bleke bloemen, zijn lange, bleke benen, die reeds licht verdorden komen als berkenstammen door het groen opdoemen.
Hij is in dit groen water nog als ongeboren, hij weet nog niet, dat sommige vruchten nimmer rijpen, hij heeft de wijsheid van het lichaam niet verloren en hoeft de dingen van de geest niet te begrijpen.
En elke keer, dat hij uit ’t bad gehaald wordt, en stevig met een handdoek drooggewreven en in zijn stijve, harde kleren wordt gesjord stribbelt hij tegen en dan huilt hij even.
En elke week wordt hij opnieuw geboren en wreed gescheiden van het veilig water-leven, en elke week is hem het lot beschoren opnieuw een bange idioot te zijn gebleven.
By M. Vasalis(pseudonym for Margaretha Droogleever Fortuyn-Leenmans, poet and psychiatrist)
Fifteen billion years ago, Before the beginning, In the Studio of Eternity There was a blank canvas, Nothingness, Pregnant with the possibility of Everything. Then—A MIRACLE! Our Collective Being, The Divine Artist—the Creator God, Aching to express, to exist, Exploded itself/ourself into a cascade of lightselves. A cosmic orgasm Big-banged us into creation, Perfect in ratios, rhythms, and forms. The Universe is a storm of light emerging, Ever birthing, ever dying Plasma selves, atom selves, molecular selves, cell selves, Conscious lumps of DNA. Ascending selves scaling evolving chains of Being. Souls inside brightening, Hardening into botanical and biological bodies. Plant self, animal self, Myself, yourself, ourselves, Family selves, city self, nation self, An earth full of eyes sees everything on earth And we are that! Planet self, star self, galactic self, Self as galactic cluster, Self as entire web of Cosmos With amnesia. Our current artistic dilemma is to wake up To the truth that we are the One Godself, Creating the Universe—Every day
Ik wil een lampje met een touw en als ik daar aan trek dat er een lied komt en iemand om te dansen iemand kalm en stil in het schemerlicht die me vasthoudt om te dansen
En dat het lied dat bij het lampje hoort fijn laat zien, aan de danser en aan mij waarin de schoonheid van de dingen zit de weerloosheid, en ondertussen dansen wij.
I have a few light bulbs with mode memory, that can switch to different scenes (bright/medium/dim) using the wall switch. I like this, because there’s no fiddling with remotes or wireless setups, it just always works.
I want to install red LED lights in my room and switch to those at night. However, there are no light bulbs with mode memory that can switch between white and red – those only exist as “smart” bulbs and usually with RGB. I don’t want “smart”.
My large light fixture has space for many light bulbs. I’m thinking about making my own E27 splitter/socket with mode memory, so I can install a regular white bulb and a regular red bulb and switch between them from the wall switch.
Idea: use an ATtiny85 microcontroller, a two channel SSR board for switching the E27 sockets, and a little 5V power supply. Maybe use a capacitor to measure on startup how long ago the thing was switch off, and decide whether to alternate output or stick with mode memory based off that.
Could even add an RTC and switch automatically at set times. But at that point, I might as well use an ESP32. And then use 2ch triac dimmer module so I can automatically dim, too.
No big thrips infestation yet this year. One Alocasia had thrips from the store, but after cleaning off and spraying with the previous mildly insecticidal spray, they didn’t return.
However, now I do have a bit of an aphid infestation – a lot of them on two of my plants, and they’ve spread a bit to other plants with new leaves too. They don’t seem to be doing much damage yet, but another spraying couldn’t hurt. So I’m making a new essential oil bug spray – slightly stronger this time, bigger batch. I’ve increased the amount of dish soap and the tea tree and rosemary, supposedly these are most effective against aphids. Lavender, lemon and ethanol kept at the same concentration.
280 drops of essential oil (~1.4%):
100 drops tea tree
81 drops rosemary
75 drops lavender
15 drops lemon
30 mL 95% bio-ethanol (~3%)
25 drops of mild dish soap
distilled water to 1000 mL
Ended up being way more than I need. I hope it kills the aphids.
Edit: two hours after spraying, barely any of the aphids seem alive still. Tomorrow I’ll clean the most affected plants off under the shower and perhaps do another spray on them, hopefully that should be enough to keep them away for a while. I did have some irritation in one eye after spraying, so I’ll be more careful with that.
Thinking about ways to automatically turn off the PSU of an active speaker. I have two options on my mind:
Locally switching PSU, with a floating input detection circuit
Remotely switching PSU, with a power signal line from audio source
Option 1 has the advantage that if it’s not connected to anything, the speaker will turn itself off. Also, no remote power signal is needed, so it can be connected with just a mono jack. However, to switch it off remotely, the source has to disconnect its output. An audio signal detection circuit would prevent the need for that, but I don’t like to turn off the amplifier when there is no signal e.g. between songs. This option needs a little battery to keep the detection circuit powered.
Option 2 has the advantage of being a little simpler, especially on the amplifier side. There is also no need for a battery. It does however need a stereo jack. Disconnecting input turns on the PSU, but I guess a simple “on/remote/off” power switch next to the jack could solve that.
1. Locally switching PSU, with a floating input detection circuit
Idea is to inject a miniscule DC sense signal (e.g. 4V through a 1MΩ inject resistor) onto the amplifier input, and use a comparator to measure impedance. If impedance is very high (input is floating so voltage is high, especially if amplifier has a coupling capacitor), keep PSU off, if impedance is lower (input connected so voltage is low), turn on PSU.
To prevent audio signals turning off the PSU, filter out the AC at the comparator (e.g. low pass using 1MΩ sense resistor plus 1µF capacitor). I doubt 4V DC at ~4µA would do anything to the source output so I don’t think I need coupling capacitors there.
Comparator would power an SSR that turns on/off the PSU. To power the sense signal and comparator as well as SSR, use a small Li-Ion battery. Float the battery from PSU using an isolated buck converter when powered on. Preferably use a protected battery. If I stay under 100µA, a 2000mAh 18650 could last over 2 years without power. Unfortunately, the most widely available comparator (LM393) draws closer to 400µA which brings battery life down a bit. Could run it with a timer and latch circuit to bring down average current to maybe 100µA, but that seems like a lot of work. Either get a lower power comparator, or just use a protected cell and accept that once every couple of months the amplifier needs to be turned on.
Would have to figure out how to drive the SSR module directly from the comparator without much current draw in off state.
To remotely switch off from the source, the source would need to lift its outputs. Putting anything in the signal path introduces noise, but something like a TS5A23157 analogue switch module with relatively low R_on and very low distortion should be inaudible.
Parts list:
18650 protected cell
isolated buck converter set to battery float voltage + output diode
LM393 comparator module (plus SSR drive circuit)
SSR module
1MΩ Resistors and 1µF capacitor
TS5A23157 module for source
2. Remotely switching PSU, with a power signal line from audio source
Use a stereo jack cable; TRS with control signal on the ring. 5V turns the active speaker off, 0V turns it on. In active speaker, use 5V NC SSR board in two modes:
Off / Control = 5 V: Power the SSR board directly from the 5 V signal line. Current draw is negligible (few µA or less, just leakage).
On / Control = 0 V: Signal line can’t supply 5 V any more. Instead, power the board from a small 42 V→5 V DC converter.
Buck converter must be isolated to prevent ground loop, and use Schottky diodes to prevent backfeeding into the control signal line. Use a capacitor by the SSR large enough to bridge the gap between powering on PSU and buck converter giving 5V.
There should never be 5V and signal at the same time through the wire, so no added noise expected as long as 0V is really 0V. I guess I can use an optocoupler, another isolated 5V buck converter and a pulldown resistor to audio gnd, to prevent injecting noise onto 0V. To prevent damage from DC with wrong connection, limit 5V output to just enough current to keep the SSR board powered.
Alternatively, directly inject 5V DC control signal onto audio signal. This allows using a mono jack cable instead, and again, audio and 5V should never be on the line at the same time. However, this would require filtering out AC at the SSR, and DC at both the amplifier and the source, and might be more difficult to prevent ground loops and noise. Also, higher chance of damage if connecting a different amplifier. Separate wire seems like a much better idea.
Reflection, issues
Option 1 seems elegant but very sensitive, e.g. to floating ground and false triggering. Switching module at source will likely add pops/noise when turning off amp.
Option 2 seems more robust, but need to think about wiring. For instance, can the source handle connecting a mono cable, shorting the 5V to gnd? I guess with good current limiting, that shouldn’t be a problem.
Ultimately, both options seem like a lot of work and can potentially introduce noise, without solving any real problems. Is it really so bad to have to get up and control a physical on/off switch, instead of a software one?
I’ve decided that “loud bass practice amp” and “low bass extension with force cancellation” are not really ideal from the same cabinet. So the 2.1 sub will be a different project.
That leaves the pipe woofer as only a bass guitar case & practice amplifier.
Easiest would be to have a single driver permanently attached on one end, with amplifier and knobs and connectors on that side too, and some sort of screw cap on the other side for accessing the bass guitar. That cap could house a reflex port.
Currently looking at the 8″ SB20PFCR30-4. In a 120cm pipe, with two 60mm ports 20cm long, the response is nicely flat down to F3@46Hz, F6@40Hz, F12@31Hz. Up to 50W input power (4 ohm) and with a 2nd order high pass, displacement stays nicely under xmax. Without the high pass and at 46W input, xmax is reached below 35Hz but there should not be much signal there from a 4 string bass. At 46W, output is about 108dB (half space) so might be loud enough to play with a drummer.
Amplifier: TPA3221 can do about 46W into 4 ohm at 20V, or for some more headroom can do about 100W at 30V (but don’t go over 32V). That seems like a good fit.
Could be powered from an 8S “24V” LiFePo4 pack (25.6-26.6V from 20-80% SoC, 27.2V for 100% SoC) or even 9S (28.8-29.9V from 20-80% SoC, 30.6V for 100%). Or a 7S “24V” Li-ion pack (25.9-27.3V from 20-80% SoC, 29.4V for 100%). Would only pull 4A max, so any 21700 will do – a 7x5000mAh pack (€14 in cells) would run the thing at rated power for 100 minutes. Or I could do a 9x4000mAh 26700 LiFePo4 pack (€14 in cells). A built-in battery also means that I could get away with a smaller power supply and still be able to play loud, perhaps a 30V CV+CC power supply like Meanwell HLG-40H-30A (€36.31) or HLG-60H-30A (€40.63). Or perhaps a little CC+CV DC-DC coverter module – but be careful that they are good quality and the output does not drift. Or just a small CC+CV lab supply. Anyway, a small CC+CV power supply would keep the battery topped up to 80%, powers amplifier during use at low levels, at high levels the battery takes over some of the load. LiFePo4 can be float charged at 3.3-3.4V so 30V for 9S would be perfect. Power supply would need to be good quality with max 2% voltage tolerance, preferably less. Maybe 8S would be safer with the 32V amplifier limit. Then also RSP-75-27 (€33.53) is possible (2.8A current limiting, adjustable voltage).
Maybe a current limiting power supply is not such a bad idea anyway, to protect the amp from burning itself. Battery could be external/optional to save weight. Anyway, datasheet says 80-85% efficiency at 50W into 4 ohm, so up to 10W dissipation – that looks to be about the maximum that the passive heatsink could dissipate. 75-100W current limiting would give some headroom but prevent prolonged high power use. On the other hand, maybe I want more headroom to be able to push the driver into distortion – at the driver’s rated program power of 100W, excursion is gently over xmax between 50-95Hz. RSP-150-27 (€35.02) set to its maximum voltage would (according to the TPA3221 datasheet) allow for 100W into 4 ohm at 1% THD, with power to spare. But then the amplifier definitely would need a fan.
Maybe go with the TPA3255 module instead and 48V 200W PSU for about 170W into 4 ohm – to really drive the woofer into distortion. And probably break it. Ok maybe 100W is plenty and having the amp clip before damaging the driver is not so bad.
Parts list:
Cabinet: 20cm PVC pipe (have), ~120cm long
Baffle & end cap: 3D printed (€?)
Port: 2x 6cm PVC pipe ~20cm long (~€6.00/scavenge)
Driver: SB20PFCR30-4 (€37.05)
Amplifier: TPA3221 module (have, €7.52)
PSU: RSP-150-27 (€35.02)
Preamp: ?
Connectors & knobs
Foam to prevent pipe resonance but mostly to protect bass guitar
Thinking of designing a plug for my 2×6″ horn reflex bass cabinet, so I can use it as a closed cabinet subwoofer in a 2.1 system with software EQ.
Checking Hornresp, if I plug the end of the horns, I get a closed cabinet with a Qtc of 0.70. Max SPL (quarter space):
Original
Closed 16L
30 Hz
74 dB
90 dB
40 Hz
85 dB
95 dB
50 Hz
94 dB
99 dB
60 Hz
102 dB
102 dB
100 Hz
126 dB
111 dB
That’s actually a useful level, I think? Max SPL is mostly independent of volume so I don’t have to think too much about the shape of the plug(s), driver volume etc. It would however need a lot of EQ to get some bass out the 12db/oct declining response. Actually a 2nd order low pass at 30 Hz might already give a decent response as well as could function as a 2nd order crossover around 150 Hz? Phase is then -90 degrees around 150 Hz, might have to reverse polarity.
Let’s look at power. Assuming the above active EQ, and aiming for max excursion at 30Hz, power requirement would be 60W total into 4W. A TPA3116D2 or TPA3221 module according to their datasheets should be able to reach that at 24V, but without headroom – a TPA3255 module >32V might be a better fit. Or TPA3223/TPA3250/TPA3251 at 32-36V.
Idea: dedicated woofer for 2.1 system. Opposing drivers to cancel vibrations.
Kallax compartment is about 335x335x390mm. A 335x335mm baffle could just about fit an 8″ passive radiator and a 6.5″ driver, but it’s very close – 8″+5″ would be a better fit. Assuming 12mm plywood, internal volume using maximum dimensions is 3.11×3.11×3.66=35.4L. Subtracting driver volume, that’s about 34L cabinet.
Let’s run some options in Hornresp (including max SPL, quarter space radiation)
Driver (2x)
Drone (2x)
F3
F6
F12
SPL@35Hz
SPL@60Hz
SB16PFCR25-4
SB20PFCR-00
54 Hz
42 Hz
33 Hz
100 dB
110 dB
Visaton W130X
SB20PFCR-00
48 Hz
33 Hz
29 Hz
97 dB
103 dB
Dayton DA135-8
SB20PFCR-00
47 Hz
37 Hz
29 Hz
95 dB
101 dB
W5-1138SMF
SB20PFCR-00
46 Hz
35 Hz
29 Hz
107 dB
113 dB
W5-1138SMF
none
66 Hz
46 Hz
29 Hz
101 dB
110 dB
SB20PFC30-4
none
69 Hz
54 Hz
36 Hz
104 dB
113 dB
Ok so assuming I can do some EQ in the low end to bring up the response, for the same money I can better just put in a pair of more powerful drivers and no passive radiators.
Looking at smaller drivers, I’m intrigued by a 2×5″ SB13PFC25-4 sub that could potentially do 91+ dB (quarter space) down to 30 Hz at xmax and would need less than 30W for it – at only 6.1L internal volume. That could fit in a 22cm cube, including space for a TPA3221 amplifier and a laptop charger to power it. But if I have the space in a Kallax compartment, 2×8″ SB20PFC30-4 looks great, much louder so probably cleaner at lower levels, and at Qtc of 0.75 should be relatively easy to EQ and crossover.
Idea: a pipe subwoofer that is triple-use: room sub for a 2.1 system, practice bass amp, and bass guitar travel case that I can put my weird small scale bass guitar in. Made out of 20cm PVC pipe (5mm wall thickness) that I already have and including an amplifier – I already bought a TPA3255 module and an 48V 200W Meanwell PSU for it.
My first idea was a transmission line to extend bass, with one or multiple drivers on one end. For instance, with a single 8″ SB20PFC30-4 driver, a 210cm pipe has its -3dB point around 40Hz and 180cm pipe at around 45Hz. However, at 120cm response gets rather peaky with -3dB around 65Hz. The pipe I have is long enough for the longer options, but the shorter one is much more practical.
Second idea is just a “closed box” – a PVC pipe closed on either end. Perhaps 2×6.5″ would be better than 1×8″, with a driver on either end. My bass guitar is 92cm long, the 6.5″ driver is 8cm deep. Minimum total pipe length would be 108cm so let’s go with 120cm. If I use 2x SB16PFC25, Qtc is about 0.74 which is close to ideal and should be pretty musical. Response is typical for a closed box, with -3dB at around 75Hz and shallow roll-off below that. Max SPL (xmax limited) in half space:
F3
max SPL 40Hz
max SPL 60Hz
max SPL 80Hz
Driver weight
Qtc (120cm)
1x 8″ SB20PFC30
75 Hz
95 dB
102 dB
107 dB
1.43 kg
0.60 (tight)
2x 8″ SB20PFC30
70 Hz
101 dB
107 dB
112 dB
2.86 kg
0.94 (boomy)
1x 8″ HW202
50 Hz
95 dB
103 dB
108 dB
1.5 kg
0.90 (boomy)
1x 8″ HDS-P830869
65 Hz
97 dB
104 dB
108 dB
1.74 kg
0.65 (ideal)
2x 6.5″ SB16PFC25
65 Hz
94 dB
100 dB
105 dB
1.92 kg
0.74 (ideal)
1x 10″ SSF102.40
50 Hz
100 dB
107 dB
112 dB
3.5 kg
0.81 (punchy)
1x 5×8″ SB15SFCR39-4
70 Hz
93 dB
100 dB
105 dB
1.65 kg
0.53 (tight)
2x 5×8″ SB15SFCR39-4
65 Hz
98 dB
105 dB
110 dB
3.3 kg
0.76 (ideal)
1x 12″ W250S-4
100 Hz
97 dB
105 dB
110 dB
3.0 kg
0.68 (ideal)
With the 1x 8″ option, the driver could be permanently attached and the other side could be an easy-access cap for putting the bass guitar in, or it could house the knobs and connectors and perhaps the amp. For the 2x 8″ option, all the amp things would need to be connected to the side of the pipe. For the 2x 6.5″ option, I could perhaps mount the drivers off-centre and use the extra space for knobs and connectors. In any case, 3d printed end cabs would probably the easiest.
Not sure yet how to make one side accessible to put the bass guitar in but also remain rigid enough as a speaker enclosure, especially if that side also houses a driver. Let’s go with the 1×8″ driver for now. I doubt I need the extra volume, and it just seems a better option than 2×6.5″.
For protection from overexcursion at high volume best pair with a high pass filter to bring xmax down to Pmax. Could probably make a switchable first order high pass filter using capacitors – e.g. 220+470µF in parallel (€9.45 at Reichelt) would be 690µF or 58Hz at 4 ohm.
If I want to pair this pipe speaker with my existing 2×6″ cabinet, I need to take into account sensitivity (in case I want to run parallel) and phase response. Looks like phase doesn’t match very well – matches ok up to 100Hz but switches to 180 degrees out of phase from 300Hz on. Guess I could use a high crossover to match up better. 150µF (€3.97 at Reichelt) at 4 ohm would be 265Hz 1st order: 0 degrees phase at 150Hz and -180degrees phase at 350Hz for 2×6″, 0 degrees and -60degrees for 1×8″ pipe subwoofer. Maybe something else and/or reversing polarity?
Amplifier: TPA3255 according to its datasheet could do 250W into 4ohm at 48V or 445W into 2ohm at 1% THD+N single channel PBTL, or 2x4ohm 235W or 2x8ohm 130W dual channel. I doubt this Chinese board can even reach half of the datasheet rating, but then most of the above options have a program power less than that, so should be enough power even if I connect the 2×6″ cabinet in parallel or on a second channel.
Perhaps for bass guitar, 2×8″ would make more sense SPL wise, but then (besides the boomy Qtc) there would be significant comb filtering because of the 120cm driver distance: cancellation at 143Hz, peak at 286Hz, cancellation at 429Hz etc. Maybe a 1×10″ or 1×12″ option would be better, but that’s hard to mate to the 20cm pipe and even heavier than 2×8″. A 10″ LaVoce SSF102.40 for instance would get about the same max SPL at all frequencies as well as better low end extension, although at 8ohm and lower sensitivity it would need a better amplifier to drive it to its maximum. 2x 5×8″ (SB15SFCR39-4) could work, but side by side are even bigger than 1×10″.
So far 1×8″ HDS-P830869 is looking best, with good F3 and Qtc, low weight, single driver, high xmax. Would need a 46Hz 1st order high pass to bring xmax down to Pmax – a single 470µF capacitor, €5.48 at Reichelt, would be 42Hz, close enough.
Next up: think very hard if I want this project.
Would be nice for a 2.1 system because it can go very low, would still need some DSP to get response flat but that’s okay. Alternatively, with DSP I can get the same SPL down to 70Hz with my current bass practice amp, but because of the horn reflex the maximum SPL drops quickly below that. Maybe try first if it can already do what I need in a 2.1 system before I continue with this pipe woofer project. Might want to install the TPA3255+PSU in my current practice amp instead.
For bass practice, again my current practice amp is better suited >75Hz, and this project would only extend bass down at lower volumes. ~100dB max SPL at half space might still be enough for my needs though.
For bass travel case, I guess this would be great, except without the speaker it would be lighter and easier. Only makes sense if I always want a practice amp together with my bass, which I guess I do most of the time? I don’t currently have a band to play with and if I did play with a drummer, this project would likely not be loud enough (not sure if the current 2×6″ would be either). Carrying both the pipe and the current 2×6″ cab is maybe doable but not ideal with other luggage as well.
Edit:
SB20PFCS30-7: Qtc 1.20, very peaky
SB20PFCR30-4: Qtc 0.60, exactly as SB20PFC30-4
SB23NRXS45-4: Qtc 0.59, nice response, F3 65Hz, +1dB max SPL compared to SB20PFC30-4, expensive
SB23N(B)ACS45-4: Qtc 0.67, nice response, F3 50Hz, +1dB max SPL compared to SB20PFC30-4, expensive
SB23CACS45-4: Qtc 0.68, almost exactly as SB23NBACS45-4, expensive
SB23MFCL45-4: Qtc 0.50, tight response, F3 60Hz, +5dB max SPL compared to SB20PFC30-4. Very heavy & expensive
SLS-P830667: Qtc 0.98, boomy
Some more options:
F3
F6
max SPL 60Hz
Qtc
Weight
Price
SB20PFC30-4
75 Hz
53 Hz
102 dB
0.60
1.43 kg
€ 36.84
DC200-8
55 Hz
40 Hz
99 dB
0.67
1.57 kg
€ 42.90
HDS-P830869
65 Hz
45 Hz
104 dB
0.65
1.74 kg
€ 56.90 (out of stock)
DA215-8
70 Hz
50 Hz
101 dB
0.58
2.45 kg
€ 63.90
CW202
65 Hz
50 Hz
103 dB
0.76
2.40 kg
€ 69.66
GBS-200F35CP02-04
70 Hz
50 Hz
105 dB
0.52 (but very peaky resp.)
2.28 kg
€ 69.95
HWB200-4
65 Hz
45 Hz
104 dB
0.65
2.75 kg
€ 79.38
2x SB15SFCR39-4
70 Hz
50 Hz
105 dB
0.76
3.40 kg
€ 85.42
SIG225-4
70 Hz
50 Hz
102 dB
0.61
2.63 kg
€ 89.00
RS225-4
55 Hz
40 Hz
102 dB
0.67
2.98 kg
€ 89.00
RS225-8
55 Hz
40 Hz
103 dB
0.64
2.98 kg
€ 89.00
DCS205-4
60 Hz
45 Hz
106 dB
0.51 (but very peaky resp.)
3.33 kg
€ 89.95
FW222
55 Hz
40 Hz
104 dB
0.78
2.30 kg
€104.95
SB23NBACS45-4
50 Hz
35 Hz
103 dB
0.67
2.70 kg
€116.95
8H2CP
55 Hz
42 Hz
103 dB
0.72
2.70 kg
€121.18
SB23MFCL45-4
60 Hz
40 Hz
108 dB
0.50
4.70 kg
€137.26
HDS-P830869 seems to be the best balance of max SPL, F3 and weight at a decent Qtc, but is currently out of stock likely until December/January. Fountek FW222 would be great, lower F3 and comes with a built in grill, but is a little more expensive and heavier. SB23MFCL45-4 is basically the price, weight and SPL of two drivers in one. It is also the only option which gets possibly high enough max SPL to play with a drummer, without being peaky.
Rough weight estimate:
PVC pipe: 5 kg
Baffle & end caps: 1 kg
Driver: 2-5 kg
Bass guitar: 4 kg
Amplifier & PSU: 1 kg
Total: 13-16 kg
In other words driver weight doesn’t affect total weight a whole lot.
Maybe I should just experiment with the cheap option first, either DC200-8 or SB20PFC30-4 + EQ the low bass response up, and if it’s not loud enough I can always get the heavier more expensive option later. Or wait for the HDS-P830869 to come back in stock.
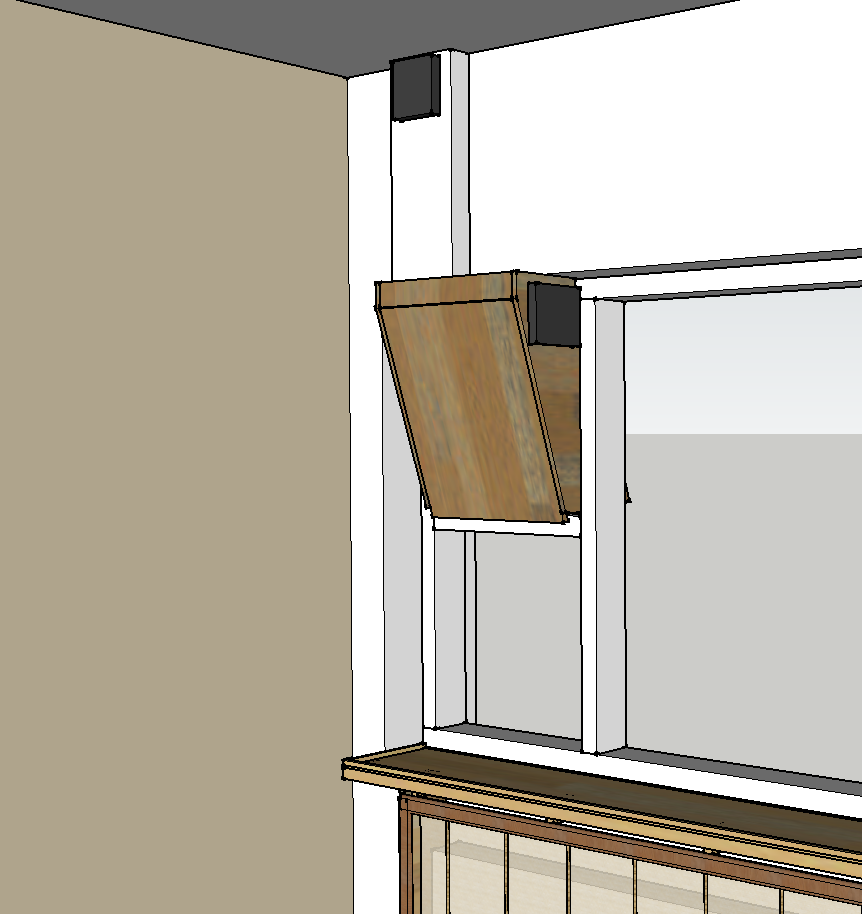
Idea: make the driver side baffle slanted. Then the pipe can stand up on its back vertically and still point its driver roughly towards listener(s), plus it gives space for knobs and connectors and possibly amplifier + PSU. Could even rotate the drivers 90 degrees and possibly mount 2×8″ vertically on the same baffle. Would be a big 3D printed piece though, and not many options to get a decent Qtc with two drivers. And probably much easier to keep the baffle straight and just point the whole pipe using legs.
Idea: make it a horn reflex cabinet instead. 1×8″ with SB20PFC30-4 and a slightly increasing reflex port from 54cm² to 108cm² brings F3 down to 41Hz, F6 to 37Hz, max SPL 108dB@60Hz/105dB@40Hz – the latter is louder even than the SB23MFCL45-4 ind a closed cabinet. The horn/port could be external, in a 3D printed end cap that inverts for travel. Some max SPL is lost below 30Hz but I don’t need that anyway.
Or a regular reflex cabinet with SB23MFCL45-4, straight 54cm² port brings F3 down to like 25Hz, max SPL 111dB@60Hz/108dB@40Hz. But the port would have to be unrealistically long.
Idea: for home 2.1 sub use, two opposing drivers (push-push) would be ideal to completely cancel cabinet vibrations. Some design ideas: putting the drivers on either end of the tube, or perpendicular to the tube facing outwards, or slot loaded facing inwards. None of these are ideal for frequencies above subwoofer level, because of comb filtering, but maybe not critical for bass guitar practice. Horn reflex 2×6.5″ or even 4×5″ with back-to-back drivers?
Idea: dual speaker baffle fits inside pipe, inverts after travel to give bigger volume. Nice idea but even with 5″ speakers doesn’t fit inside 20cm pipe, can only work with non-opposing driver up to 6.5″, or 5″ if sideways and I also want to include the amp+PSU in the same module. Not ideal with drivers at opposite ends, and/or non-integrated amp because of the cabling. So would only work with a vertical array of 5″ speakers on one baffle, or a single 6.5″ at the top.
Idea: passive radiator on one side. Available PRs are tuned too low to be useful, would need smaller box and 2x PR Sd*Xmax compared to driver Sd*Xmax.
So far dual 6.5″ or 8″ (one on each side of the pipe) with a port seems to make the most sense if I want to keep with the multipurpose idea. Could possibly make one side extendable, uncovering knobs and connectors and housing amp+PSU. In any case, not sure how I would get a non-leaky fit between the baffle and pipe end that can be opened to get the bass guitar out.
Either that, or drop the 2.1 requirement and make it a 1×8″ or even 1×10″ design with less low end focus, more efficiency focus. Use a separate woofer for the 2.1 system which is more focused on low end extension but at low volume and without having to play beyond 150Hz, focused on small box and no vibration (e.g. two opposing 5″ perhaps with opposing passive radiators).
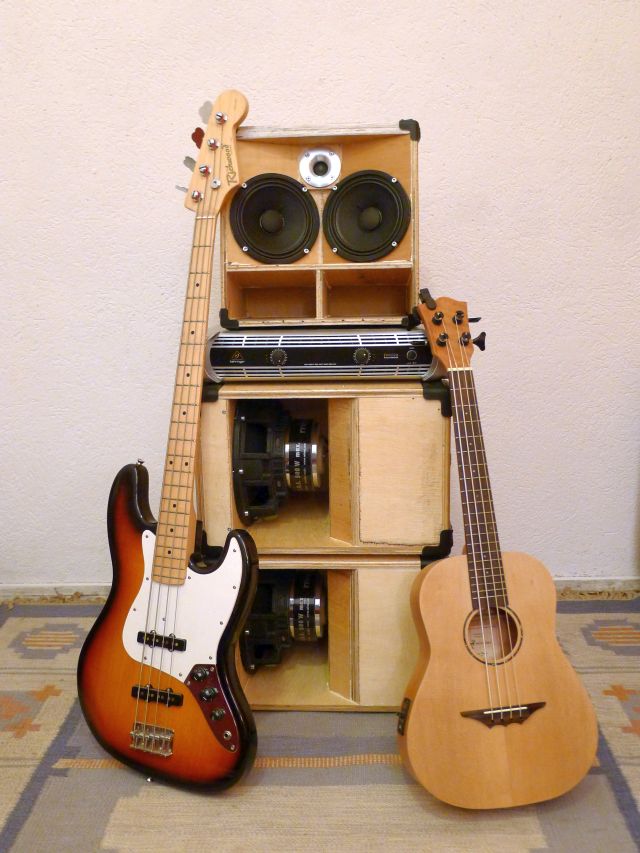
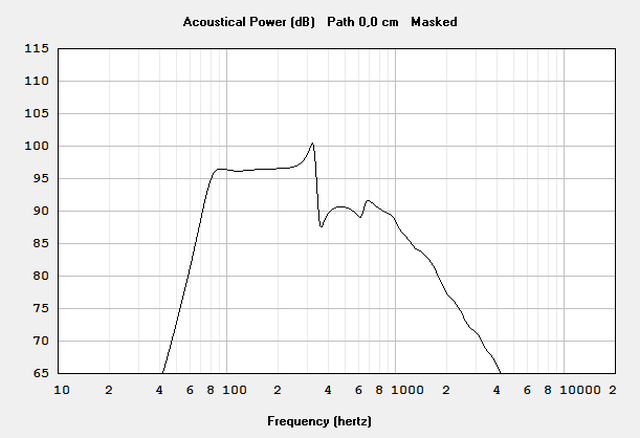
Early 2015. 10″ tapped horn “subs” to go with my 2×6″ “top” cabinet, for bass guitar. Also used as bass speakers for house parties at the time. Currently gathering dust, not sure what I will do with these.
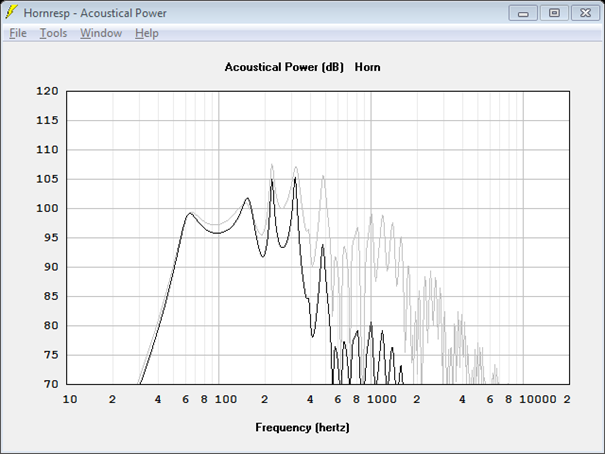
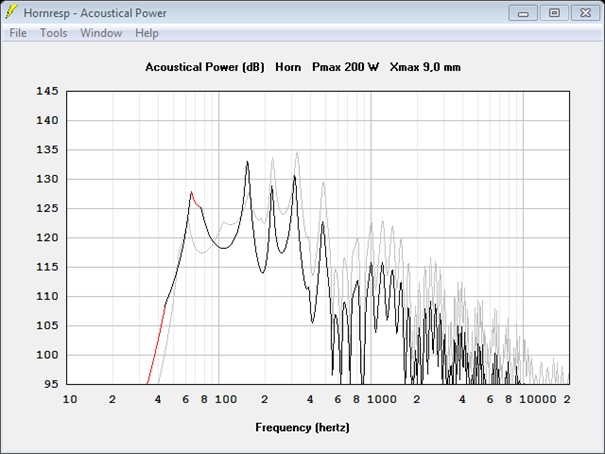
These are copies of THAM10 as designed by Anders Martinsson, except with Mivoc AWM104 drivers instead of B&C 10NW64. I don’t remember modifying anything besides the drivers. I went with these drivers because I think they were about a third the price, they have 9mm xmax and they were available in 4 ohm. They model okay down to 60Hz in a THAM10 enclosure – a little more peaky in the bass, but also less efficient outside of the horn response so less noise there and therefore a little easier to cross over. Hornresp modelled response and max SPL at Pmax&xmax with AWM104 (black) vs original 10NW64 design (grey):
They actually sound pretty good for bass guitar with just a THAM10 and the 2×6″ top cabinet, without any crossover. Weight is about 16kg each (10kg wood, 6kg driver). I powered them using a Behringer iNuke NU1000. Iirc, one of the cabs rattles a bit at full volume.
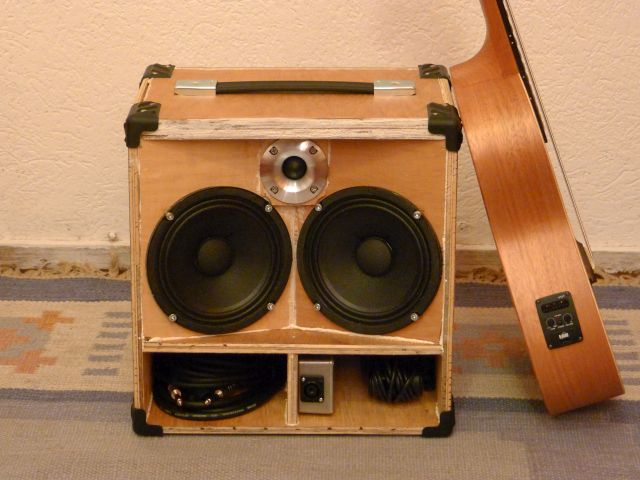
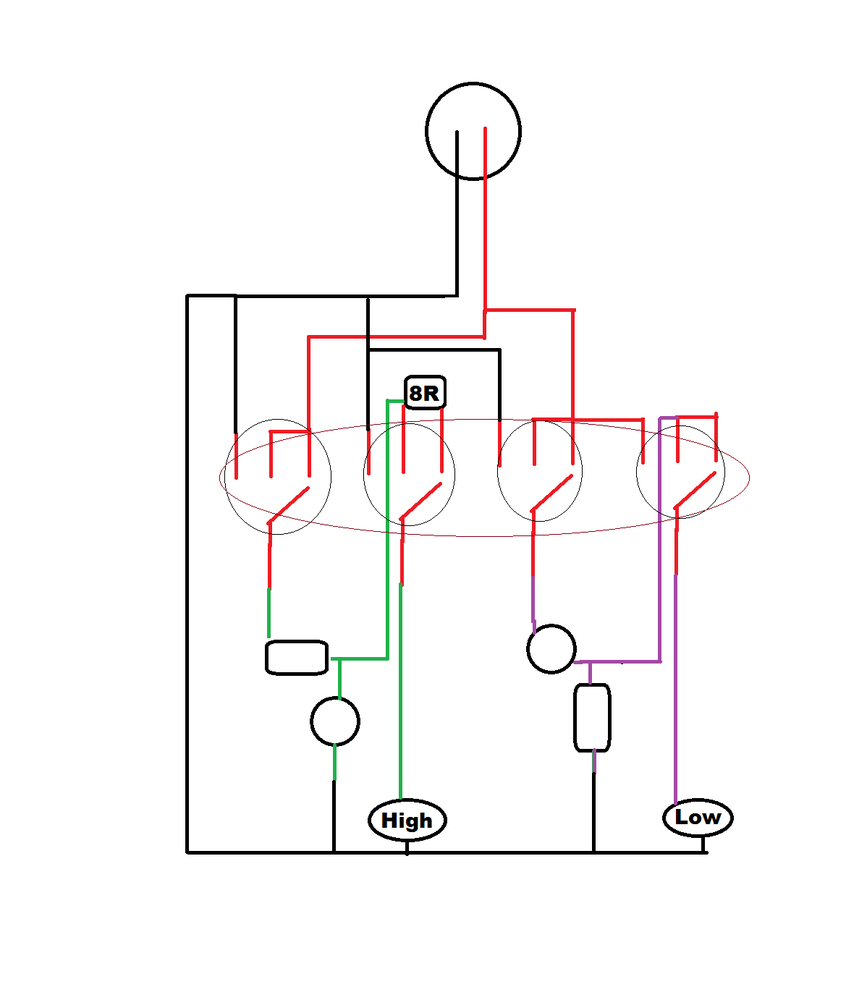
January 2015, text/instructions from back then too. I’m a little sad that I mounted the tweeter up top, and not in the middle as a “nose” with little teeth as drawn as an option in the cutsheet picture. Still, I love how it sounds for bass guitar. Still a great practice amp, only thing I changed since 2015 is put little wheels under it. Might one day make it active by putting a plate amp in the back.
For this 2×6″ top cab, I was mainly inspired by Arjank’s Piccolo8 horn reflex cab, since I really liked the clarity of bass lines on my small horn reflex bookshelf speakers. I was also inspired by greenboy’s cabs that have 6″ mids and a tweeter as a vital part of the sound. I was also inspired by Bill Fitzmaurice’s XF guitar cabs that mount two speakers in a cross-firing position and with a rear tilted baffle. I designed the cab using Hornresp. When I’d finished it, it was a bit peaky in the 100-300Hz region but after stuffing the driver volume it sounded a lot better.
At practice volume, the 2×6″ goes low enough on its own. Over ~40W, I needs a high pass filter >150Hz to keep from farting out (xmax) and I add one or two of the TH cabs.
— Wood — This design uses 12mm plywood. If you are REALLY careful, you can cut all but the tweeter baffle from a quarter sheet (1220x610x12mm). See the cut sheet in the Sketchup file. The entire driver enclosure is tilted backward 9 degrees compared to the horn port. The two 6″ drivers are crossed inward at 20 degrees each. NOTE: the two baffle pieces, the piece at the top of the baffle and the top part of the cab therefore have a few 9 or 20 degree cut angles that you should not overlook!
— Drivers — This design uses two Fane Sovereign 6-100 6″ drivers. The volume behind the drivers and the length of the horn are based on Hornresp simulations of the frequency response of the cab with these particular drivers in it. Using different drivers will have a very big impact on the frequency response of the cab; you will probably get a big thump around 150Hz and not much response in the frequencies below that. At the bottom of this file, you will find the Hornresp values that I used if you wish to try modelling different drivers. That said, the tweeter (Mivoc XGH 258 ALU) could be replaced by a different model or even omitted. If you go for a different model tweeter, you may need to change the crossover. My cab benefitted a lot from stuffing the volume behind the drivers with the insides of a pillow. You could also use actual BAF wadding or wool, and/or line the inside with felt. This will help dampen unwanted sound reflections.
— Crossover — The crossover that I used is a simple passive second order crossover around 2550Hz. The woofers have a combined impedance of 16 ohms around this frequency and the tweeter as well. I used a 3.9uF capacitor and a 1.0mH inductor for both the low pass and the high pass sieds. Make sure the capacitor is bipolar and the inductor is of reasonably low resistance. I am new to crossover design though so I’m sure there are better ways to go about it.
— Crossover switch — If you want to be able to switch between running the 6″ drivers full range, or adding the tweeter via the crossover, use a rotary switch. I’ve used a 4P3T rotary switch that in the third switch position adds an 8 ohm resistor in series with the tweeter. This pads the tweeter a bit, but it also changes the crossover point slightly so this is not the best way to pad the tweeter. I mounted the rotary switch in the horn mouth, where you can easily access it.
— Using the cab — If you use the cab on its own, note that it will fart out if you push more than approx. 40W into it. If you wish to get more output, you can add a high pass filter and cross over the lower frequencies to a different cab. That way, the cab can handle about 200W. I use a tapped horn cab crossed over to the 2×6″ cab around 175Hz. The TH design that I used (THAM10) is freely available on the website of Anders Martinsson, the designer, at http://www.martinsson.cc/
— A suitable amplifier — If you wish to make the cab into a combo, or just want to have a small amp for it, I recommend looking into the TPA3116D2 amplifier. You can order a board cheaply from China (<$20) and its output is perfect for this cab. If you use a 19V laptop power supply, it can push about 35W into the cab at below 0.1% distortion. With a 24V power supply you could get about 60W out of it. If you run in PBTL mode, it is 2 ohm stable and you could get up to 100W if you add another cab. You can set the gain at either 20, 26, 32 or 36 dB. With both pickups at 100% on my jazz bass, I found that the gain was enough to practice without a preamp, but I recommend setting the gain to 32 if you have a passive bass and will not be using a separate preamp. More on this amp at diyAudio here: http://www.diyaudio.com/wiki/TPA3116D2_Boards
— Hornresp input data — Ang 2.0 x Pi Eg 2.00 S1 70.00 S2 280.00 Con 47.00
Sd 139.20 Cms 8.00E-05 Mmd 23.94 Re 6.90 Bl 13.25 Rms 1.35 Le 1.15 Nd 2P
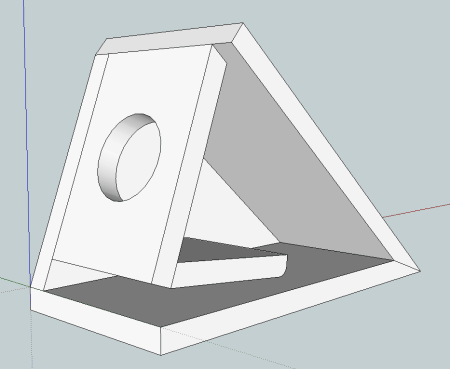
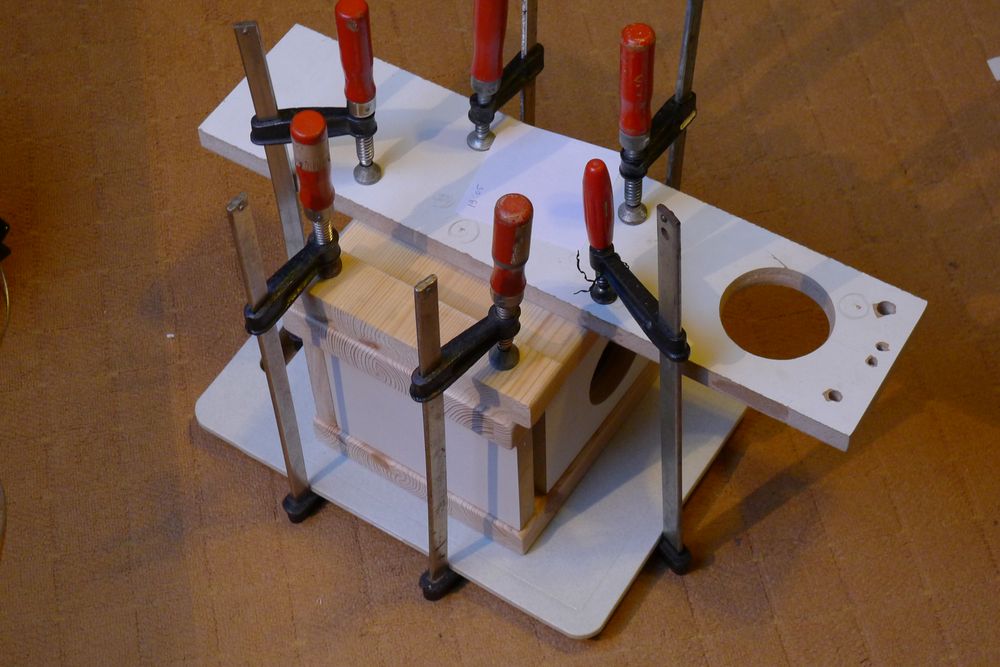
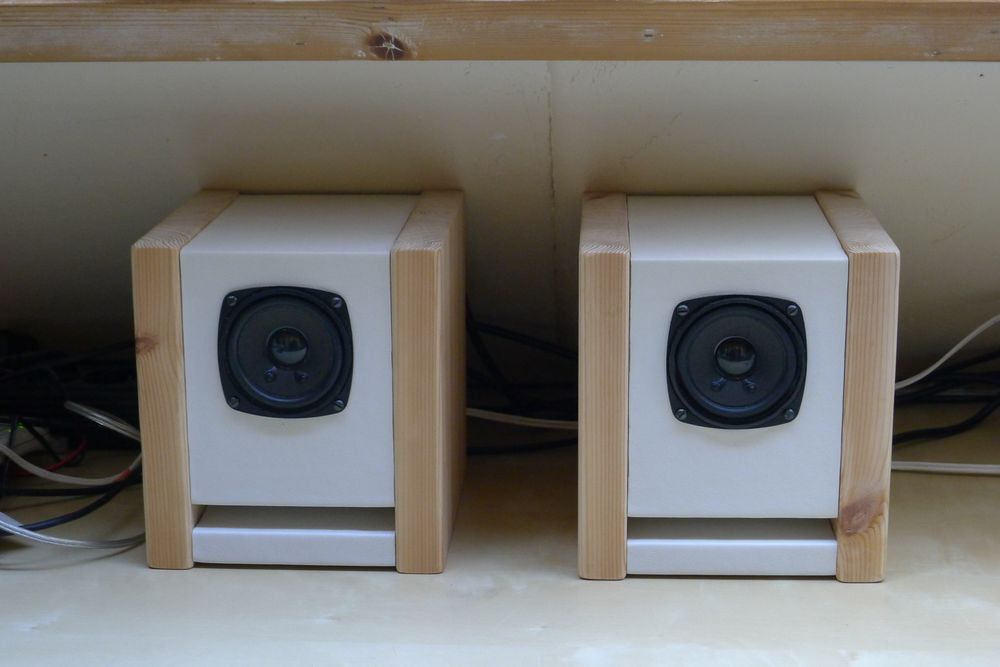
I think I built these in 2014. They’re a copy of the “Leuk & simpel hoorn reflex monitortje met FRS8” project by meiborg on zelfbouwaudio.nl forum. I first wanted to modify it into a triangular shape because of my room at the time, but decided against it because I didn’t have the woodworking tools or skills required.
They use a Visaton FRS8 full range driver, and a horn reflex port to bring the response down to about 100Hz. I like how they sound, I even built someone a second set as a gift.
I’m trying Alocasias again after finding this method with Sphagnum & leca. However, when I got home from the plant store with my newly bought Alocasia cuprea, I found out that it had thrips. I thoroughly showered the plant and removed all the soil (microwaved for later re-use) and repotted with the new method. I couldn’t find any more thrips after that, but to be safe I wanted to try a mild insecticide.
A retired botanist in the comments under this video recommended a 200 mL leaf spray using 13 drops of lavender essential oil, 19 drops of lemongrass essential oil and 5-7 mL rubbing oil (to emulsify). I don’t have lemongrass oil, but I do have lavender and a few other somewhat insecticidal oils. Also, instead of rubbing alcohol I have bio-ethanol which I think should work similarly well as an emulsifier and contact killer for some pests.
So I’m trying this leaf spray:
32 drops of essential oil (~0.8%):
15 drops lavender (somewhat effective against thrips as well as mites)
9 drops rosemary (mostly effective against spider mites)
5 drops tea tree (antifungal, effective against spider mites)
3 drops lemon (somewhat effective against thrips)
6 mL 95% bio-ethanol (~3%)
2 drops of mild dish soap
distilled water to 200 mL
It does smell nice, although I know it’s not very healthy to inhale so I spray somewhere with good ventilation that I know nobody will be in for a while. Also citrus oils can cause phototoxicity so I should only spray in the evening.
Let’s see if the plant survives the repotting and leaf spraying, and if the pests stay away so it can graduate from quarantine.
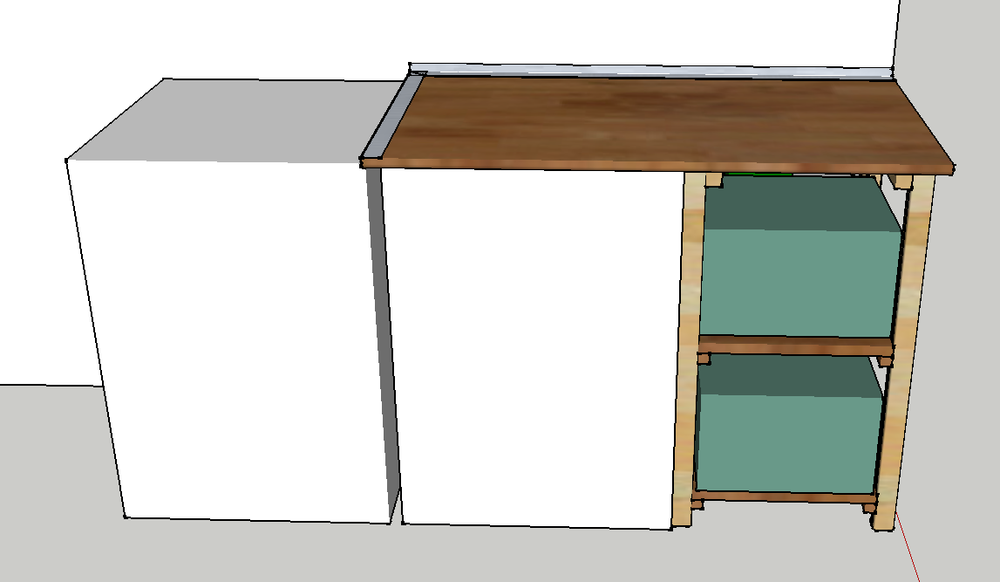
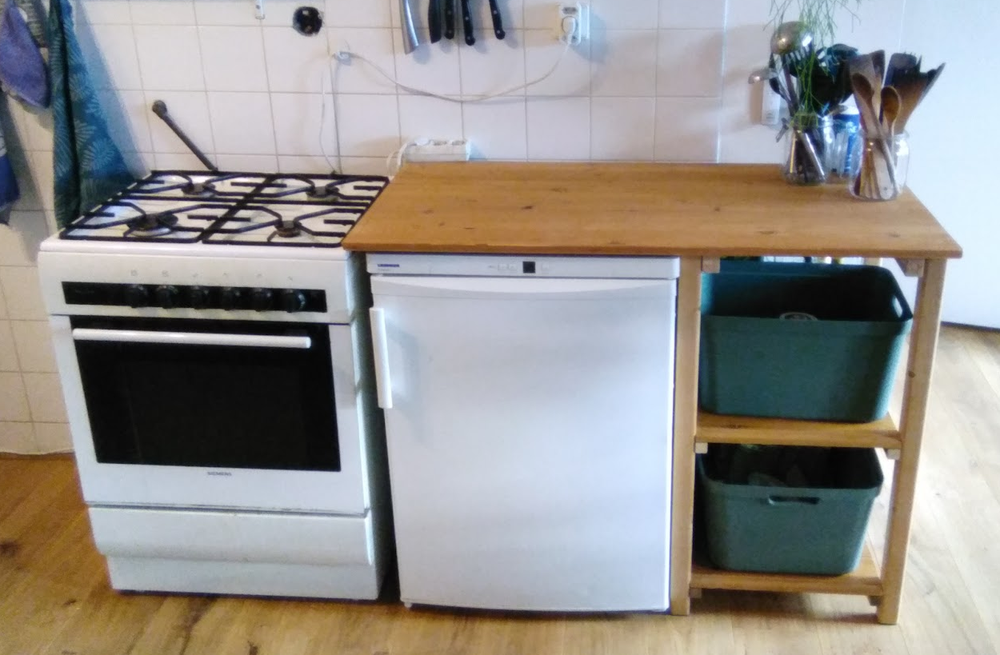
I designed a kitchen counter top with two shelves around an under-counter fridge, and built it together with a housemate all within a day. We used only recycled wood. The legs are actually made out of 8 slats from an old bed frame, glued together in pairs. The counter top and shelves were the top and bottom of an old wooden cabinet. I cut everything to size with a hand saw and I’m proud of how straight I managed to cut everything. :)
Only things to do still are sand and varnish it, as well as mount the aluminium strip along the stove side and the rear.
Then sensors select mode & fan speeds & compressor power, based on humidity, CO2 level and inside & outside temperature. I would like a variable compressor for more quiet and efficient operation. Not sure ow to set up the valves, maybe include backdraft dampers to prevent crossflow between modes..
Or maybe I should do away with the AC option, and just have a separate dehumidifier & ventilation box. It would need double the filters but no valves. Perhaps I could use a cheap 12L/day dehumidifier as-is, attached with its fan intake to a CR box. If that’s too loud, replace the fan with P14s. Then a separate ventilation box with its own filters that takes in outdoor air. Or I guess I could house the filters and fans in the same box, but the air flows would be separate. Edit: dehumidifiers typically push warm air out the back, not the front, so directly attaching to a CR box is slightly harder than I thought especially if I want to keep the original controls accessible. So I’ve swapped my link for one that takes air in from the back.
I really should think about minimum viable product and optimise for getting it done instead of trying to design the perfect solution and never finishing it.
All the materials arrived so I started some tests. I did some 10×10 cm test pieces, as well as wrapping a glass bottle. Some early thoughts while the test pieces aren’t even fully hardened yet:
This shit is messy! No way will I be able to do 5 gram test pieces; at least that much material is stuck to my hands every time I put it on the tulle fabric
I made some calculations errors. 50 grams of gypsum gets me about 3 pieces of double layer 10×10 cm, not one. This is good. If I want more texture, of course I could use more
It sets quite slowly, I was still able to put some texture into it about 1½h after mixing. I think even for larger pieces I can just mix a single batch without having to worry too much about the setting time
I think my fabric is not ideal. The tulle is a tad too “open”, it doesn’t absorb the gypsum material as nicely as the gossamer used by the guy in this video. Still, that doesn’t seem to matter so much – it spreads out easily after applying the layer
I’m not sure yet how much top layer I will need. The texture of the tulle fabric comes through in spots where I don’t have much material on it, I don’t know how bad that would look when it’s set. Perhaps it’s fine after wet brushing
Colour:
The gypsum plaster material is not pure white, it’s actually a nice beige even if I don’t add pigment
The brown is great. Mixed at 4% it gives a warm light brown colour, at 8% it’s not much darker though
The black pigment is not as powerful as I had hoped. Mixed at 4% it gives a light cold-ish grey. Also, a little granular – doesn’t mix as easily as the brown
It is possible to put a pigmented layer directly onto an unpigmented one, and unless the first layer was very thick it won’t mix through much. This saves some pigment
I haven’t tried painting yet. With how the pigments are working, I think I should aim for a nice light brown base colour, wet brushing with a dark colour and perhaps some dry brushed highlights
Thinking of how to use this material for our festival decorations:
The original idea is to make trees. Depending on how strong it hardens, I think it will work!
Perhaps we can also use it to make 2D mascots, which we currently saw out of thin plywood. This material is easier to do indoors (no loud/dusty sawing)
3D mascots and objects other than trees could be possible too!
If it’s strong enough with thin layers that still let through light – perhaps make a really cool lamp shade?
Next up:
Testing colour
Getting the main colour right: testing a few different percentages of brown, as well as mixing in some black with the brown
Getting some brushes
Trying some diy dark paint/paste out of the black pigment
Wet brushing dark (shadows)
Dry brushing light (highlights), e.g. with corn starch
Perhaps adding some green flocking powder or some other way to simulate moss
For fun: trying my blue and red pigment powders
Testing texture
How thick should the second layer be?
Wet on wet, or second layer onto dried first layer?
Different techniques of applying bark texture
Testing construction / backing
Different backing materials (paper towel, paper, cardboard, plastic..): how strong is it?
Found this video, I think he’s a theatre decor making teacher. He uses gossamer fabric drenched in drywall joint compound, about two layers, to make a hard shape, and quickly makes texture on top of it using excess drywall joint compound. Awesome. Looks much easier than the papier-mâché clay options I looked at before.
Ideas for making bark texture:
Using an icing bag to make stripes of bark texture, like this guy did with ferrocement
Using a roofing nail to make “valleys” for the bark texture
Perhaps use a silicon mould with some sort of release spray to make bark texture
Just folding the fabric into little vertical ridges
Colouring ideas:
Dark base coat, dry brush highlight on the ridges
Could use dark pigment in the mix so I don’t need a base coat and damaged pieces aren’t so visible
Just dissolve iron oxide pigment into thick paste and dry brush that directly onto wet project?
Perhaps some white (TiO2) pigment to make even brighter highlights
Black pigment in layer mix, brown pigment in extra “ridges” mix. Or just sprinkle some on the leftover mix used for ridges and barely even mix it in for some organic variation?
Light base coat, wet brush darker colour into ridges
Iron oxide brown in mix
Dissolve carbon black into paste and wet brush onto wet project, wipe ridges
Perhaps some extra dry brushed highlights
Other ideas:
Flexible mixing container so dried gypsum is easy to remove sounds like a good idea
Carbon black pigment – 1.25 kg should also last a while. Recommended to mix in at 4.8% with concrete, up to 9.1%. I don’t need very black, and gypsum probably needs less pigment than cement, so it should colour 25+ kg of gypsum
Iron oxide brown pigment – 0.45 kg. Probably not as potent as the carbon black, might still try mixing in with the gypsum, or I could just dry brush it on as a thick paste made with just water
Gypsum, I ordered “Gyproc Blokkenwand Stuc” which is a gypsum plaster that can also be used as a block glue, it sets in about 2.5 hours (45 minutes working time) and is suitable for thin layers up to 5mm. Sounds ideal. Comes in 10 kg, or 25 kg which only costs 19% more. However, I don’t have much space to store things, so I got the 10 kg. If it works very well I can always get a bigger one later.
Total cost €55.57. Assuming my projects will need two 2mm layers, the gypsum will make 3m² worth of projects, the fabric and black pigment should last at least 7m².
Next up:
Picking up ordered materials and some cardboard
Making space and putting down plastic groundsheet
Testing:
Tulle layers: 10×10 cm pieces with 2-3 layers of tulle onto vaselined cardboard. Use about 50 grams gypsum, 42.5 mL water
Pigment/colour: bunch of 3×3 cm pieces using 5 grams of gypsum and 4.25 mL water each, plus different amounts of pigments. Use milligram scale & weighing boats – 7 mg accuracy gives about 15% relative error at 1% pigment, I’m ok with that.
Texture: 30×30 cm pieces, should be about 350-500 g each
Folding design: 45×60 cm piece with a horizontal & two vertical folds. Should weigh about 1 kg
Non-flat surfaces: try on a pool noodle or something similar
I was looking at some compounds our lab is throwing out, saw calcium chloride and sodium sulfate, and figured those react to make gypsum. This brought me back to an old papier-mâché clay project idea I had.
Goals:
Create 3D forms, e.g. fake tree bark / branches
Somewhat fireproof
Somewhat strong
Traditionally papier-mâché clay uses PVA glue, drywall joint compound (mostly gypsum) and paper to make a paste that can be shaped like regular papier-mâché but becomes much harder and stronger. I think I didn’t continue with the project before because the PVA glue got prohibitively expensive for larger projects. Now I’ve found some projects using cheaper glue, e.g. from flour/cornstarch or cooked flour. Here‘s another even simpler recipe with just flour, drywall compound and paper fibre.
Actually the first recipe is already all I need. I could add some pigment powder (e.g. iron oxide) to the mix to make it browner, so it requires less painting. This should work (video). Painting: perhaps only some darker paint in the ridges, I think using the technique in this video.
If my lab is really discarding so much calcium chloride and sodium sulfate, maybe I could make my own gypsum. However, gypsum is cheap, so it’s probably not worth it. In the interest of finishing the project, I guess I should buy drywall joint compound (snelgips). If it sets too fast, I could add a bit of citric acid (maybe 1-2% of gypsum weight) to slow the setting time.
I could use the potato starch that my lab is throwing out (expired 15 years ago), but again, starch is cheap – corn starch is like €3 per kg.
I’ll need:
Papier-mâché clay ingredients
Flour
Cornstarch
Gypsum
Paper or cardboard – pressed cardboard apparently works well, I could save some from the lab
Aluminium foil
For small batches:
Bowls
Second hand hand mixer
Base/armature out of cardboard
For larger batches:
Buckets (have)
Paint mixer on electric drill (have)
Base/armature out of PVC or wood
I could even make a tree sculpture out of the large 20cm diameter pipe that I have. Perhaps something like this. These much smaller sculptures are also very nice.
First I should make a small test batch, and also check if it is indeed fireproof!
Here‘s a recipe with just powdered joint compound and gossamer fabric instead of paper. It’s not really papier-mâché clay any more since there is no cellulose fibre, however it looks even easier, lighter, quicker to use. Hmm. Gossamer fabric is cheap (€1-2 per m, 1.4m wide),
Ikea Starkvind is an EPA12 filter, comparable to MERV18, >99.5% filtration efficiency of particles 0.3 µm and up. This is way overkill. Most CR boxes are constructed with a much less restrictive MERV12 type filter, which is maybe 25% efficient at 0.3 µm. I mainly want to filter dust, pollen and mould spores, which are >3 µm, and I want to use PC fans so I want a non-restrictive filter so I can make use of the high air flow. Even for smaller particles, it would make sense to use a less restrictive filter with a lower filtration efficiency if it means it can move more air; 100 m³/h at 60% has a better clean air delivery rate (CADR) than 50 m³/h at 90% efficiency.
Judging by the measurements by Rob Wissman, the Ikea Starkvind is so restrictive that it needs more than twice the filter area for the same flow compared to the MERV12-13 Filtrete 2200 filter. So perhaps I should look at a different filter.
I looked at the different filter types available in the EU; the EN779 standard from 2012, and newer ISO 16890 standard. I think M6 (old standard) or ePM10 >60% (new standard) would be ideal, comparable to MERV11-12. However one class higher; F7 / ePM1 >50%, comparable to MERV13; is easier to find. That’s still 5 classes lower than the Ikea filter so should still offer much less resistance. Perhaps a class lower (M5 / ePM10 >50%) would still suffice.
A single 287x592x48 mm M5 panel probably offers about the same resistance as 4 Ikea Starkvind panels. I think that should work well with 5x Arctic P14 fans. Assuming fans performing at 60% max, and 50% PM10 efficiency, that’s about 185 m³/h CADR or about 3.6 clean ACH in the room. Or I could use 2x 292x292x48mm F7 panel with 4x Arctic P14, assuming again fans performing 60% max, and assuming 90% PM10 efficiency, that’s about 267 m³/h CADR or about 5.1 clean ACH. Enough space to expand to more fans and/or filters if needed.
Those seem like better filter choices than the Starkvind. Also, I received some feedback that I didn’t think of: I should probably reverse the flow so it doesn’t pull in dirty air right over my face when I’m sleeping. I guess inflow from the top, out from the front would be ideal. Back to the drawing board, I guess.
I’ve been reading up on Corsi-Rosenthal Boxes, a relatively quiet and cheap kind of air purifier. The idea is to use off the shelf filters, but instead of a loud high static pressure fan on a single filter, using multiple filters so that the air resistance is low enough for quieter low static pressure fans. They’re typically made with MERV filters, but those are not readily available in Europe, so instead I could use Ikea brand EPA filters, or perhaps automotive particulate filters.
One rough rule of thumb says use about 4x the fan area in filter area. I think they mean filter dimensions, not total unfolded filter area. If I use 3x Ikea Starkvind filters (37x29x4cm), that comes to about 4x 14cm PC fans or 5x 12cm. I assume the 14cm fan option is quieter for the same airflow so I’ll go with that.
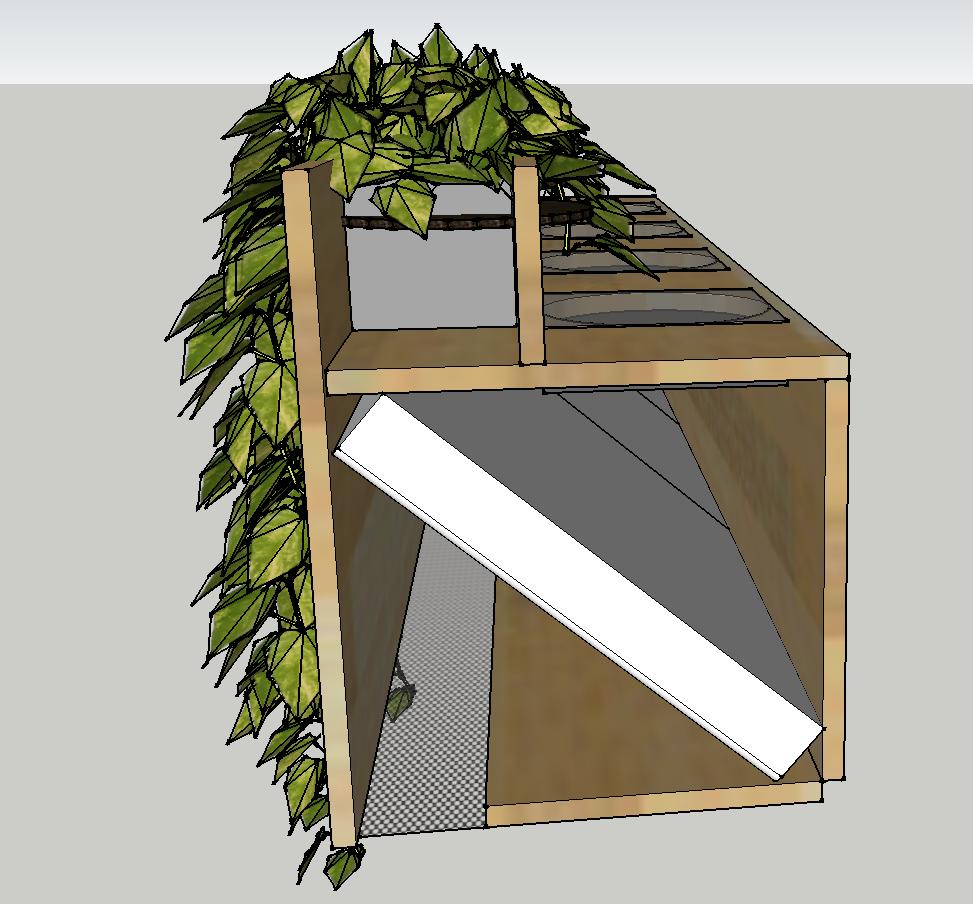
I don’t have space in my room for a free standing box, and the only place where a wall mounted box makes sense is above my headboard where I was planning to put a plant shelf. So I’ve designed something that combine a CR box (with 3x Starkvind filters and 4x 14cm fans) with two small planters that fit 9x9cm square nursery pots:
This is a “traditional” CR box approach with the 4 fans mounted together at the top, and the planters just hanging on the wall separately. I think the box sticking out of the wall looks a little weird, but I think this would be the most efficient option. Still, I don’t like it, so here’s another design:
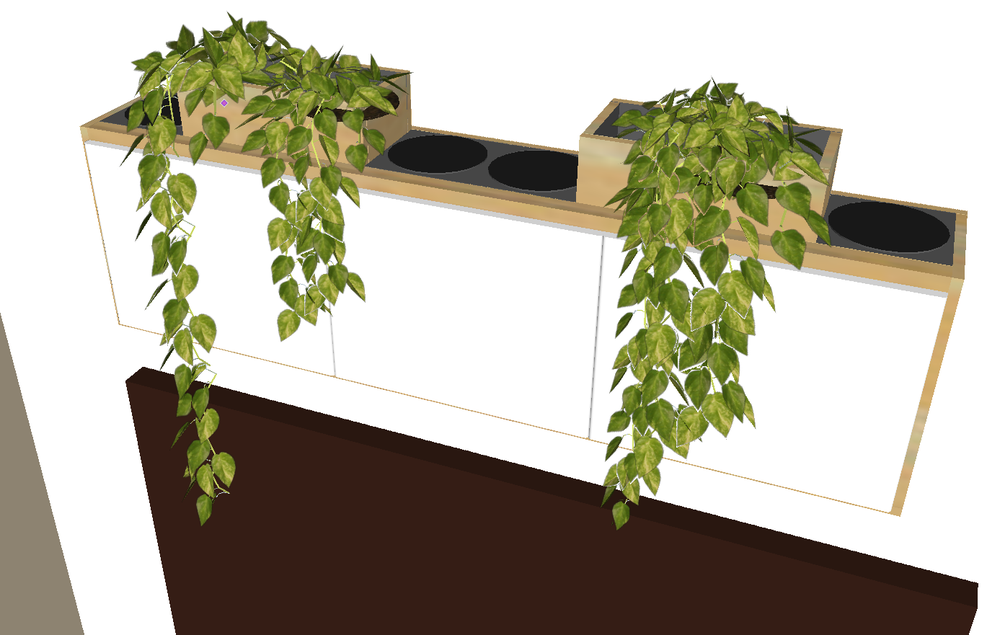
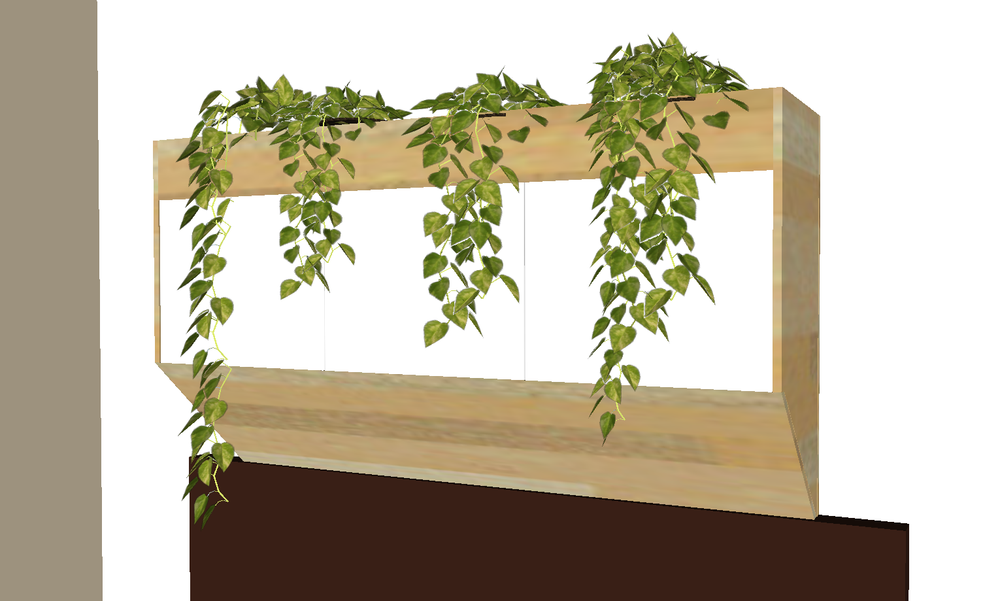
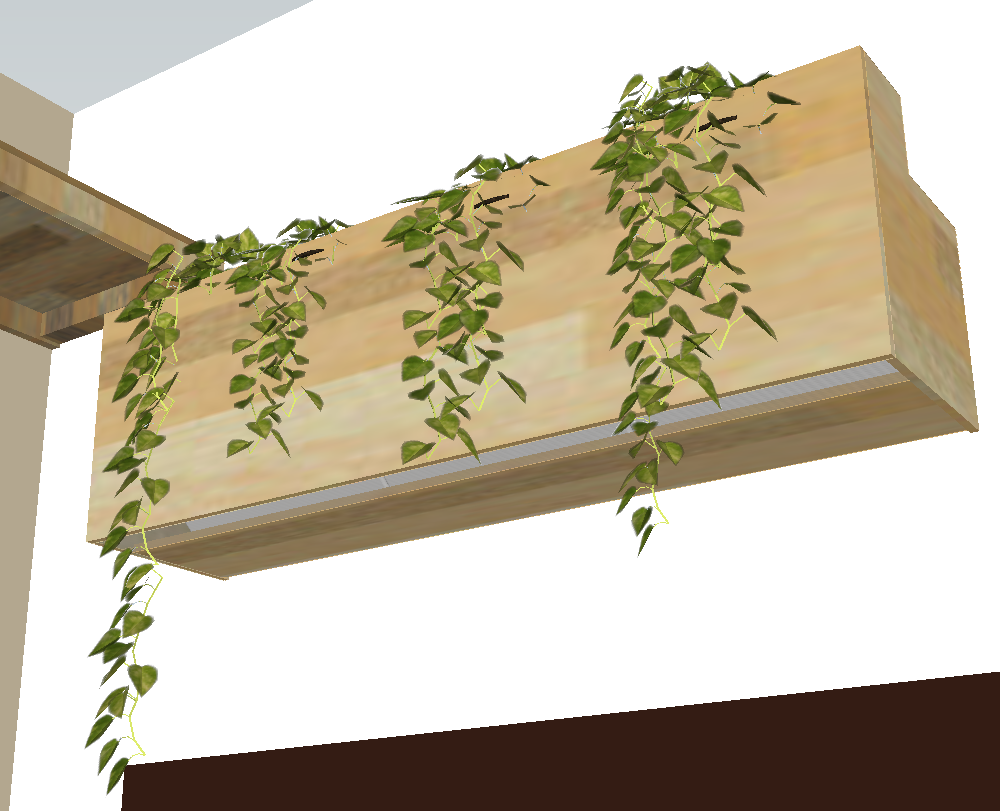
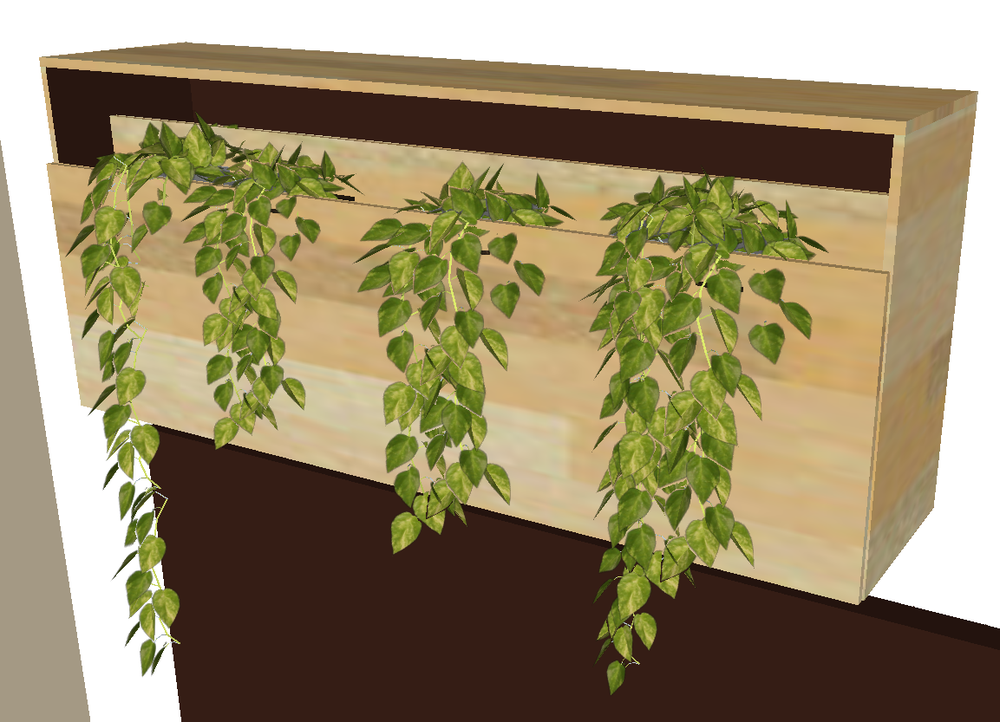
This one has the filters neatly mounted side by side, and the four fans on the top have two planter trays interspaced. This option is quite slim and has everything integrated. I think it would look nice with some vines trailing over the filters, although I should take care that they don’t grow into the fans.
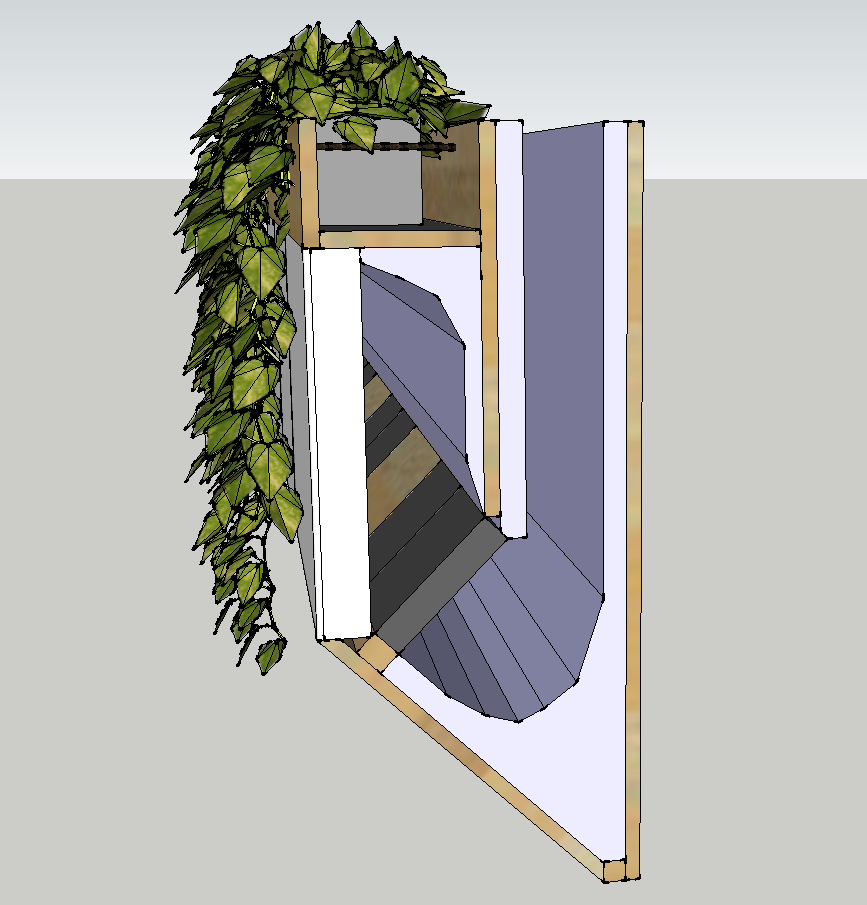
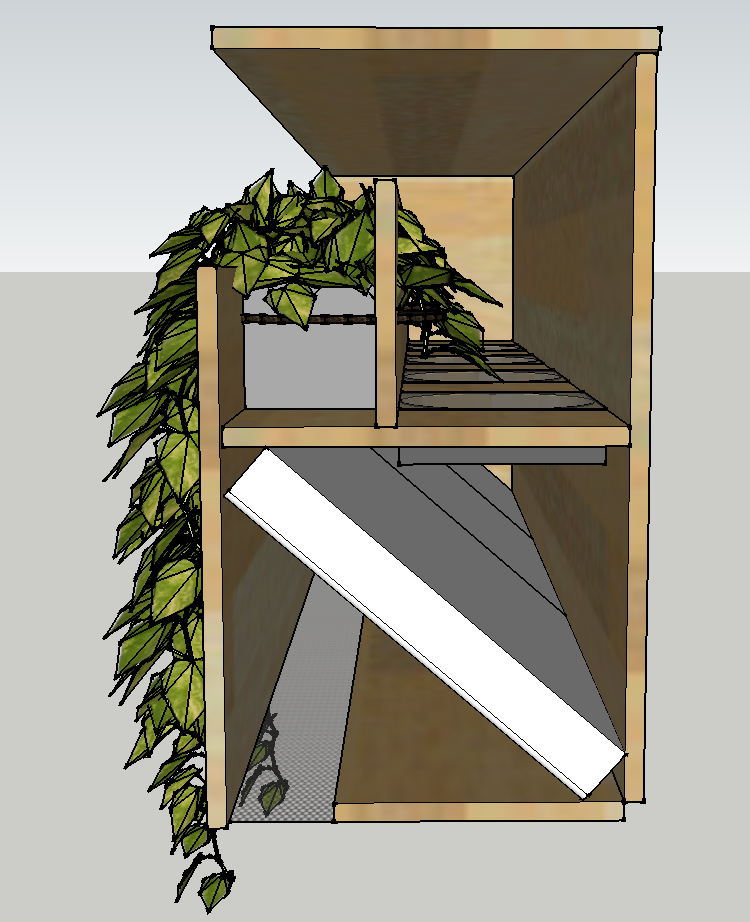
One thing to keep in mind is that this is right over my head when I’m sleeping, so it needs to be very quiet. So another option is to design a “sound maze” by having the air flow around a baffle, and sound proofing the surfaces (drawn here in lavender):
To keep the design somewhat narrow, it’d use 5-6x 12cm fans instead of 4x 14cm. An added benefit is that the plant tray runs the whole width, and plants are less likely to get into the fans:
As a soundproofing material I’d use either cotton (low VOC) or sheep’s wool, which actually absorbs VOCs and is better with moisture. Perhaps use old wool blankets.
Quick budget calculations: €38.99 for the plywood, €35.97 for the filters, €24.79 for the fans, so about €100 in materials excluding sound proofing and a fan speed controller.
For fan speed control, I’m thinking of an ESP32 or Raspberry Pi controller, maybe also to log some sensor data and/or control lights in my room.
Some calculations. SergioCoscolin looked at a box with 2x Starkvind filters, and tested 3x Arctic P12 fans versus 5x the same fans. Results:
Fans
CADR
CADR/fan
CADR/fan airflow
3x P12
143 m³/h
48 m³/h
51%
5x P12
173 m³/h
35 m³/h
37%
Either 5 fans is running into diminishing returns for 2 filters, or perhaps the dual direction output is less efficient.
Let’s assume my design is a little less efficient because of the extra air path from the baffle, so let’s take the 70 m³/h per filter of the higher efficiency solution above, but assume a 40% CADR-per-fan-airflow. Since I’ve got 3 Starkvind filters, I’m aiming for 210 m³/h CADR (4 air chances per hour in my room), so 525 m³/h total fan airflow. That’s 5x P12 fans or 4x P14 fans on full speed.
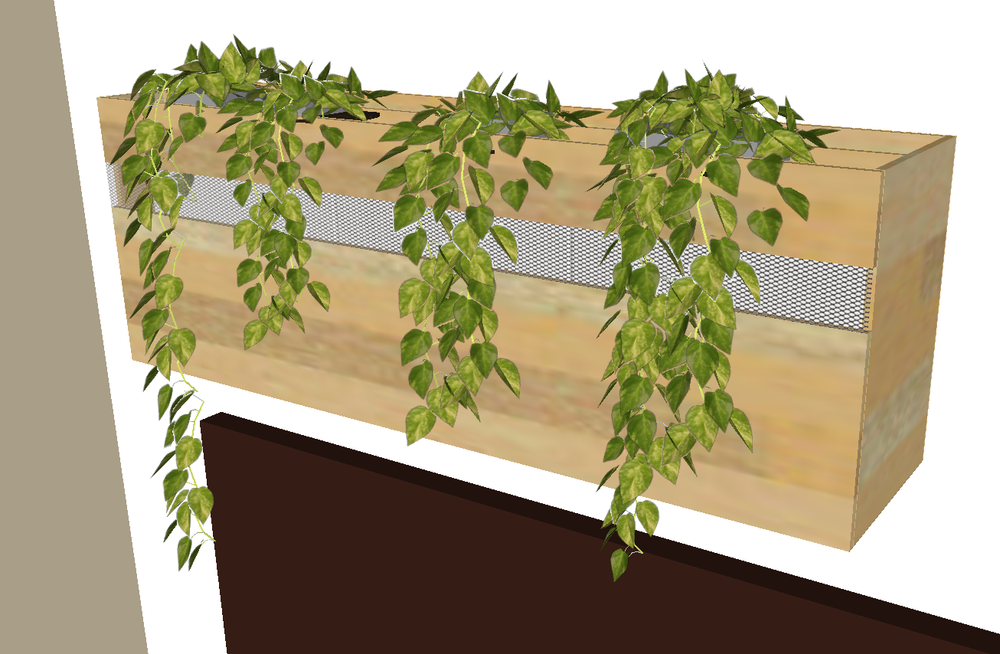
I like the “dampened” design, but it’s quite big and I don’t like the 45 degree angles. Also, the filters in plain view will get dirty. Perhaps I could hide them. Here’s a simplified design with the filters behind a mesh covered front inlet slit:
The inside is also simplified, with only right angle plywood. I haven’t drawn in any damping material but I think it could still fit. The front panel would need to hinge open, to be able to access the filters and fans, and it also clamps the filter in. This version uses 4x 14cm fans.
Next up I should do some static pressure calculations. The designs with baffle don’t make much sense if the added static pressure requires many extra fans to compensate the loss in airflow. In that case I’d probably just use a more airflow-efficient design with better fans, or just run at a lower speed.
Here’s a simpler more airflow efficient design with the 4x 14cm fans just pointing straight out the top. Air comes in through a mesh in the bottom. The bottom panel hinges to be able to access and clamp the filters.
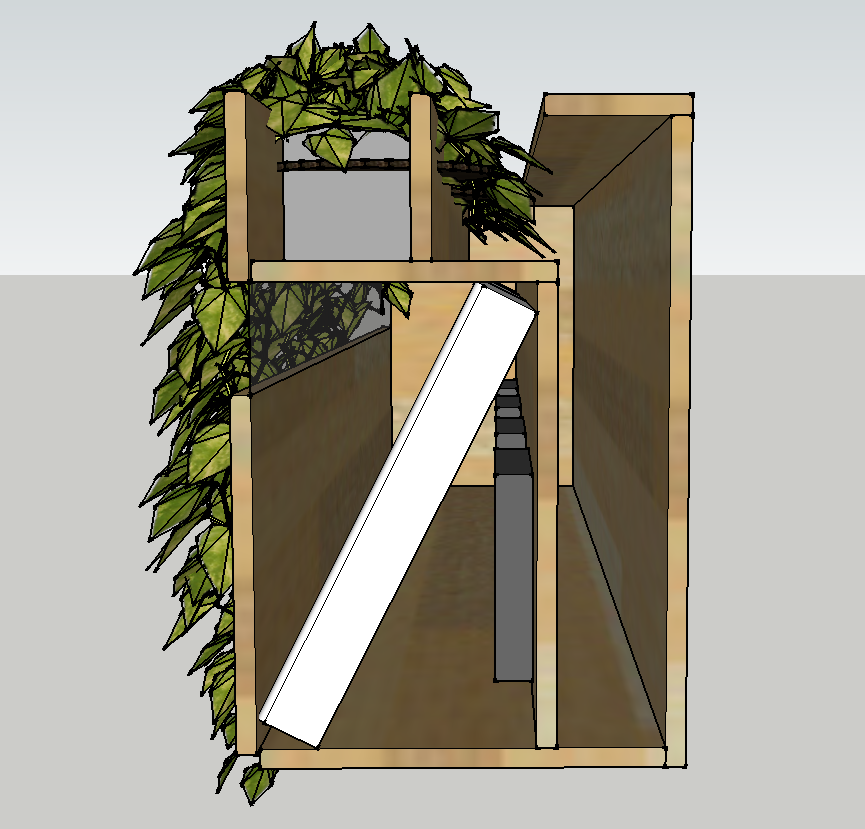
Ok, one more design. This is the above design expanded with a “hat” so I could include a baffle. The air comes in the bottom and goes out the front over the plants. I think this is the least flow impeding baffle design, and it has the added benefit of being able to put stuff on top of the thing.
Oops, I forgot to draw in a flow diverting corner piece in the top right in this side view. Anyway, I think this is a pleasing design, especially if I use some of the same felt I used on my headboard as the top layer damping material.
I guess I could use the same mesh material used for the bottom opening in the top too, to prevent the plants from growing into the fans. Maybe attach both of the mesh pieces with little magnets, like an insect screen.
I could install GU10 downlights into the bottom panel. There’s enough space, and I don’t need to worry about the fittings leaking air since it’s before the filter.
I’m happy with this design! I guess I’ll skip the static pressure calculations.
Note to self: don’t use PVC pond liner to make the plant tray watertight; use something lower VOC like EPDM or PE. I think I might still have some 250 µm PE sheet.
Humidity in my room is really starting to be a problem with all the plants I’ve got, and I haven’t even started up my active hydroponics systems or moss poles.
In a previous post, I looked at heat recovery ventilation to remove humidity without losing or gaining too much heat. I wrote that a ductless in/out “recuperator ventilation” system would be easiest/cheapest. Some thoughts:
Efficiency is low, closer to 50% than the claimed 80-90%
Decent units start around €300. Would be cheaper to just heat more and open the window in winter, or run a dehumidifier, though those wouldn’t solve hot & humid summer problems
DIY would be difficult, because of the fan; most modern fans (including PC fans) can only run in 1 direction
Soundproofing is difficult
So I’m going back to a counterflow heat exchanger idea. I previously looked at using a Stork heat exchanger unit, or perhaps repurposing only its core. However, that would be way too big for just my room, so I’m looking at making a smaller heat exchanger myself. I would still like it to be as efficient as possible. Main things that influence efficiency:
Surface area of heat exchange
Thickness of material
Thermal conductivity of material
Maximum surface area is dictated by shape/construction of the exchanger and static pressure performance of the fans. To improve the other variables, I should use a material like copper aluminium, that is as thin as possible. I’m thinking aluminium foil like this DIY design that uses stacked panels clad in aluminium foil, or this design that uses 0.5mm aluminium sheeting folded in a zig-zag pattern.
I really like the aluminium foil panel design, but I should take care that condensation does not cause issues e.g. with mould, so I don’t think I should mount the foil on wooden frames. Perhaps something 3D printed could work. I would also use thicker industrial grade foil instead of household foil.
I should think about the space that is available, and how I can fit the core, insulation, fans, filters, perhaps a sound baffle etc. into that. Ideally have the two outlets as far apart as possible to prevent short circuiting, both inside the room and outside the window.
Here’s a first sketch of a compact unit using a 50x30x12cm core, clad in 4cm insulation and surrounded by a plywood shell that fits in the window opening. One 140mm fan would be mounted near the ceiling on a 220x54mm duct, while the other would come out sideways by the window. Or perhaps I could mount both fans on the housing and/or run the duct further out. The core would be made of 16 panels, each constructed out of 7.5mm PVC U-profile with slits for passing the air in between the foil.
I have an idea for a bouldering chalk bag in my head. I’m writing it down so I don’t forget.
It’s basically the triangular shaped “Jr.” chalk bag from pofzak.com, except the base is rectangular (so a little wider), and there’s a cutout for a water bottle in the middle against the back. Perhaps a carry handle on the water bottle side. For the closure, I’m thinking of using the same system used for drybags so the water bottle is not in the way. Edit: like the Organic Climbing “deluxe chalk bucket“, perhaps even with magnetic closure.
Bouldering is going great. I’ve been steadily progressing and I’m now projecting 6Bs and 6B+s – flashing most 6As and even flashing some 6Bs. This is a big jump from my evaluation in April and I didn’t think I’d ever get this far.
My planned exercises aren’t going too well, but that’s ok. I do still occasionally do stair climbing cardio, but it’s mostly the 30 minute bike rides (and back) that have been improving my stamina. Besides that I haven’t done much exercising lately.
Points of attention:
Elbow: I’m starting to feel my elbow again, if I don’t work on my antagonist forearm muscles I feel like I will get tendonitis from the muscle imbalance. Or maybe since it’s mostly my right elbow, it might also be mouse RSI worsened by climbing. Anyway, wrist roller seems to immediately make it better, so I should do that.
Clavicle: I have some mild pain in my right acromioclavicular (AC) joint, but not from bouldering; I always get this when I do pushups. Again it might be mouse arm RSI, worsened by exercise. I think I should strengthen my rotator cuff and work on scapular control. Probably my shoulder stability is my most limiting factor in bouldering at the moment. Instead of pushups I could do band chest press, which is a bit more controlled.
Core: has been getting stronger from just climbing lately. Could use some extra exercises, but no longer as big an issue as it was in April.
Finger tendons: my finger strength has been steadily increasing without issue despite not doing any specific exercises. I’m a little worried that extra finger strengthening would be too much because I already boulder 2-3 times per week, so I’m no longer doing hangboarding.
I’m thinking about doing an antagonist muscles & shoulder health exercise routine after every bouldering session, because then I’m already “in the flow”.